
DISCLAIMER: I am a telephony hobbyist, and nothing remotely resembling a professional installer or consultant. What I’ve done here is tied to a particular hardware and software configuration, and a specific set of goals for how I want my phone network to work. My limited experience thus far has taught me that ISDN PRIs–especially on gear of this vintage, and with its many quirks–can be configured in nearly any way you can imagine, in pursuit of nearly any functional outcome, depending entirely on what you want your system to do. Thus, this guide is necessarily narrow in its focus, and cannot possibly begin to cover every scenario you might dream up. We will only cover the particular scenario I developed in my mind way back when I first got my Merlin Legend. I will try to keep things as generic as possible, but YMMV.
About the AT&T Merlin Legend
The AT&T Merlin Legend is a wonderful old PBX system. Wonderful, old, cranky and cantankerous, frustrating, and immensely rewarding, once you get it working. I am not a telephony professional, nor do I play one on TV, and as a great many seasoned veterans (many of whom can undoubtedly trace many a gray hair and facial wrinkle back to adventures with this hardware) will tell you, the Merlin Legend is probably a less-than-optimal choice for a hobbyist’s first PBX: Fisher-Price My First PBX it most decidedly is not. However, the aesthetics of MLX handsets, the aesthetics of the PBX itself, and its vibe–reminiscent of a bygone era–proved irresistible to me.
I probably would choose something else if I had to do it over again, but in the end, it’s been a highly-rewarding learning experience.
My Gear
This is the gear I had coming into the project:
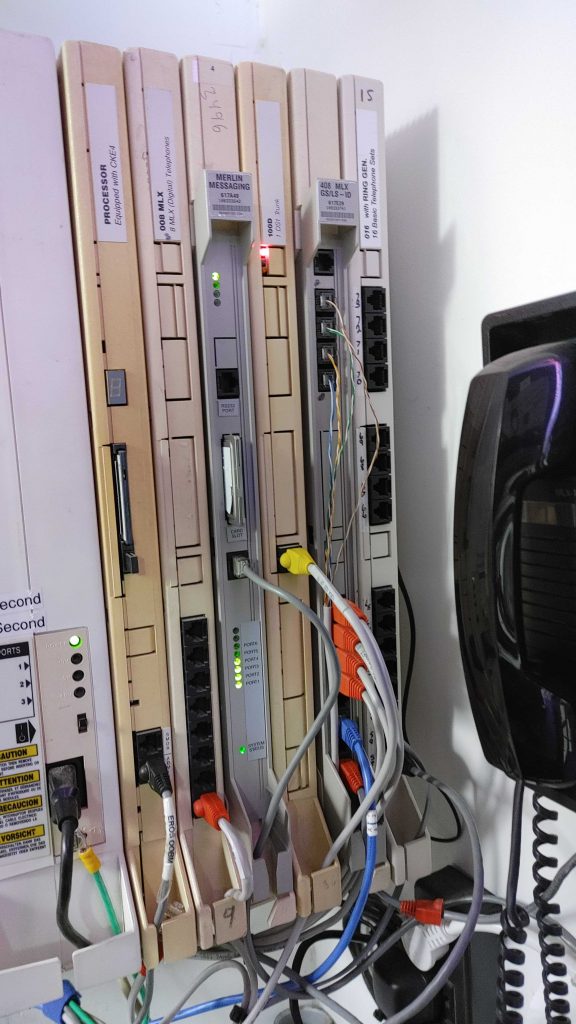
Merlin Legend PBX
- Processor: CKE4
- Slot 1: 008 MLX – 8 MLX (Digital) Telephones
- Slot 2: Merlin Messaging R1 with 4 ports
- Slot 3: 100D – 1 DS1 Trunk
- Slot 4: 408 MLX GS/LS-ID
- Slot 5: 016 with Ring Gen. – 16 Basic Telephone Sets
I’m running the Merlin Legend with the following basic characteristics:
- System mode is Hybrid/PBX (Key mode is decidedly not what you want for this setup)
- Numbering scheme is Default Numbering -> 2-digit Extensions
- The operator station is Extension 10 and is an MLX-20L, if memory serves
- The line/trunk pool in use for outbound calling is Pool 70, which I believe is the norm on the Merlin Legend
FreePBX/Asterisk Server
- Dell PowerEdge R610 1U server
- Sangoma A102 2-port PCIe T1 card
- Running the Sangoma FreePBX distribution
My first run at this fence was with a Digium TE110PE T1 card–it would NOT talk to the 100D board in slot 3 of the Merlin Legend by any craft I possess, nor would any amount of coaxing, wheedling, or bold-faced threats dissuade it from its indefatigable contumacy. It also threw spurious interrupts constantly, and caused the server to hard reboot and throw fatal PCIe errors constantly. I do not recommend the Digium card! Also, the Sangoma wanpipe tools cannot deal with it at all, making DAHDI troubleshooting way harder than it needs to be. Spare yourself the trouble I went through and find yourself a Sangoma A102!
Now, let’s take a look at the goals I had when looking to set up an ISDN PRI between the Merlin Legend and FreePBX.
Goals
Going into this, I already had a SIP trunk on the FreePBX server going off to voip.ms, where I have 16 DIDs, as well as a Cisco 7965G IP phone running SCCP firmware, using the chan_sccp Asterisk module. I could place and receive calls with this system. Configuring IP phones and SIP trunks is out of the scope of this article, but it is decidedly the easy part, and others have covered it far better than I ever could.
Also, the Merlin Legend already had a single LS trunk (extension 827) provisioned from Xfinity, which could place and receive calls. Extensions could dial each other and dial out. I have the Merlin Messaging board running an auto-attendant that helps filter my incoming calls.
What I wanted was as follows:
- The ability to dial Merlin Legend extensions from my IP phones on the FreePBX side
- The ability to dial FreePBX IP phone extensions from the Merlin Legend side
- The ability for the Merlin Legend to place outbound calls through FreePBX, allowing more than one concurrent conversation involving the PSTN to take place
Let’s get into the setup!
Setup
Cable Plant
First, we’ll tackle the physical layer here. You will need a T1 Crossover Cable to connect the FreePBX server to the 100D board in your Merlin Legend. You do not need a channel service unit in between. I used plain, unshielded twisted pair Category 5e cable. See the image below for the correct pinout.
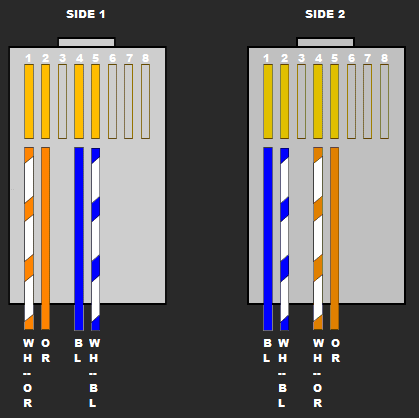
Figure 1: T1/E1 Crossover Cable
Note that in the above diagram, pins 3 and 6-8 are not connected.
Merlin Legend T1 Configuration
A T1 line consists of 24 channels each having 64K/s bandwidth. Think of it as the delivery mechanism on which our PRI will be carried.
The 100D DS1 Trunk board in the Merlin Legend is notoriously picky. The slightest misconfiguration will not allow it to work. Please follow the below steps very carefully, but don’t panic.
In all of these Merlin Legend menu instructions, <slot-number> refers to the slot in the Merlin Legend where your 100D board is installed. In mine, that’s slot 3.
If you have just installed a 100D board in your Merlin Legend, you will need to do a board renumber to make sure all of the board’s trunks are added to the system inventory. Please note that this will very like change the trunk numbers on boards subsequent to your 100D board, and thus may require some fairly substantial re-programming efforts. For example, if your 100D is in slot 3 (like mine), any trunks appearing in slots 4 and 5 will likely be re-numbered.
If possible, it would be ideal to put your 100D board in the last slot (slot 5) of your Merlin Legend chassis. It is also advisable to keep a backup of your configuration on hand, in case you blow anything up! I restored mine from backup several times during this process.
Framing and Suppression
Framing must be set to ESF:
Sys Program -> Exit -> LinesTrunks -> LS/GS/DS1 -> <slot-number> -> Frame Format -> Extended Super Frame -> Enter
Suppression must be set to B8ZS:
Sys Program -> Exit -> LinesTrunks -> LS/GS/DS1 -> <slot-number> -> Suppression -> B8ZS -> Enter
Type
Type must be set to PRI:
Sys Program -> Exit -> LinesTrunks -> LS/GS/DS1 -> <slot-number> -> Type -> PRI -> Enter
This will cause the PBX to reboot.
Merlin Legend PRI Configuration
PRI (Primary Rate Interface) is an ISDN (Integrated Services Digital Network) technology. For our purposes, the PRI consists of twenty-three B-channels (or bearer channels) that each carry a single telephone line, and one D-channel (or data channel) that is used by our equipment as a control plane, dealing with call setup and teardown, and other such tasks.
Switch Type
First, we will set the PRI switch type to 5ESS:
Sys Program -> Exit -> LinesTrunks -> PRI -> SwitchType -> 5ESS -> Enter
T1 Clock Source
You will need to set the primary clock source on the Merlin Legend to Loop, causing the Merlin to derive clocking for the T1 from the line, rather than generating the clock locally. This is required for our configuration.
TODO: document the location of this setting in the operator console
Line Buildout
The line buildout on the Merlin Legend must be set to 1.
TODO: document the location of this setting in the operator console
B-Channel Group
Next, we will set up a B-channel group (group 1) containing channels 1-23:
Sys Program -> Exit -> LinesTrunks -> PRI -> B-Channel Group -> B-Channel -> 1 -> Enter
At this point, you will be prompted for B-channels to add to the channel group. The format here is SSCC, where SS represents the slot number of our 100D board, and CC represents the B-channel number in the specified slot. We need to add channels SS01 through SS23 to B-channel group 1.
Once this is done, you can get out of this menu and head back to the B-Channel Group menu.
Lines
Next, we need to add the first 23 lines on the 100D board to the inventory of lines associated with B-channel group 1. On my system, these are lines 801-823. Having an up-to-date inventory report on your Merlin Legend’s contents from WinSPM is very handy here.
Sys Program -> Exit -> LinesTrunks -> PRI -> B-Channel Group -> 1 -> Lines -> 1 -> Enter
From this point, you are associating line numbers with B-channel group 1. Add the first 23 lines. Do not add the 24th line, as it is the D-channel, and adding it to the lines for the b-channel group will prevent your PRI from functioning correctly.
Network Service
We need to set the Network Service to CBC (Call-by-call).
Sys Program -> Exit -> LinesTrunks -> PRI -> B-Channel Group -> 1 -> NtwkSvc -> Misc -> CallByCall -> Enter
Incoming Routing
We need to set incoming routing to Dial Plan:
Sys Program -> Exit -> LinesTrunks -> PRI -> B-Channel Group -> 1 -> IncomingRtg -> Dial Plan -> Enter
Dial Plan Routing
Next, we’ll set Dial Plan Routing to Any:
Sys Program -> Exit -> LinesTrunks -> PRI -> Dial PlanRouting -> Service -> 0 -> Misc -> Any -> Enter
Outgoing Table
This gets a little bit complex. Basically, the outgoing table for call-by-call service has 10 patterns, numbered 0 through 9, that it will use to match the phone numbers of outbound calls. For example, a pattern of 8 matches any number beginning with 8 (e.g. 8, 813, 890).
Since we’re looking to have any phone number match, we need patterns of 0, 1, 2, 3, 4, 5, 6, 7, 8, and 9:
Sys Program -> Exit -> LinesTrunks -> PRI -> Outgoing Table -> CBC Svc -> Pattern -> 00 -> Enter
At this point, you will be prompted for a pattern number. Enter:
0 -> Next -> 1 -> Next -> 2 -> Next. . . 8-> Next 9-> Enter
Network Service
Next, we’ll set the network service:
Sys Program -> Exit -> LinesTrunks -> PRI -> NtwkSvc -> Misc -> No -> Enter
Special Service Table
We must now set all eight DelDigit entries in the Special Service Table to zero, as we don’t want to chop off any digits for calls going out through our PRI:
Sys Program -> Exit -> LinesTrunks -> PRI -> Outgoing Table -> Special Svc -> Del Digit -> 0 -> Enter
At this point, set all DelDigit entries to 0:
(Change to 0) -> Next -> (change to 0) -> Next
Until entries 0-7 are all 0.
Add PRI Lines to Line Pool 70
Next, you need to add lines 1-23 on your 100D board to line pool 70:
Sys Program -> Exit -> LinesTrunks -> Pools -> 70
And add those first 23 lines. On my rig, this is lines 801-823. Consult your inventory!
This will cause the Merlin Legend to try your PRI lines for any attempted outbound call.
At this point, use your maintenance menu to un-busy the slot where your 100D board is, as well as all ports on that slot. Explaining how to un-busy (aka Restore) slots and ports is beyond the scope of this article, at least for now.
FreePBX PRI Configuration
Now, we turn our attention to the other end of our little setup here.
TIP: If FreePBX complains that it cannot connect to Asterisk after clicking Restart DAHDI and Asterisk in any of the below steps, log into your FreePBX server via SSH, and type the following command at the UNIX shell prompt:
fwconsole restart
DAHDI Channel Configuration
DAHDI is the Digium Asterisk Hardware Device Interface, and is the component of an Asterisk (and by extension, FreePBX) system that handles communication with T1, PRI, FXO, and FXS interfaces, among others.
Configure Sangoma Settings
- In the FreePBX menus, navigate to Connectivity -> DAHDi Config
- Click Sangoma Settings on the right side of the screen
- Configure per Figure 2, below
- Click the red Apply Config button at the top right of the screen
- Click the Restart DAHDI and Asterisk button beneath the DAHDI Configuration tabs
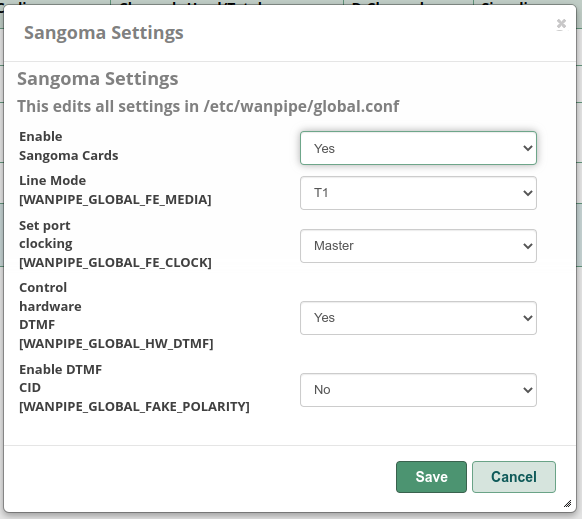
Figure 2: Sangoma Settings
The crucial settings here are WANPIPE_GLOBAL_FE_MEDIA and WANPIPE_GLOBAL_FE_CLOCK. Remember, for a PRI, the Merlin Legend requires the T1 clocksource to come from the loop, not local. Setting WANPIPE_GLOBAL_FE_CLOCK to Master is crucial for that.
Configure T1 Span
- In the FreePBX menus, navigate to Connectivity -> DAHDi Config
- If you are using a Sangoma A102 T1 interface, in the Digital Hardware tab, you should see two spans, Sangoma Technologies – wanpipe1 card 0 [1] and Sangoma Technologies – wanpipe2 card 1 [2], representing the first and second ports on the A102 card; we assume that you have the Merlin Legend 100D board connected to the first
- Click the Edit hyperlink for the first card/port
- Configure per Figure 3, below
- Click the red Apply Config button at the top right of the screen
- Click the Restart DAHDI and Asterisk button beneath the DAHDI Configuration tabs
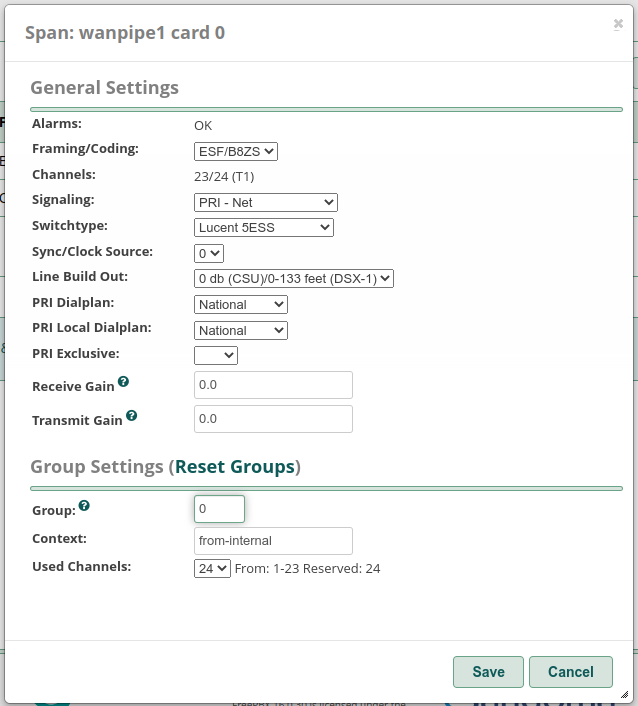
Figure 3: Span Configuration
When you change Signaling to PRI – Net, please note that the switchtype will automatically change to EuroISDN, which is not what we want. Switchtype must be Lucent 5ESS.
The Sync/Clock Source setting being 0 means that we will generate our own clocking. Line Build Out (LBO) being set to 0db (CSU)/0-133 feet (DSX-1) is critical for our purposes.
I left PRI Dialplan, PRI Local Dialplan, and PRI Exclusive settings, as well as the TX/RX gain settings, at their defaults.
NOTE ON SWITCHTYPES: Many of you with Merlin Legend experience will probably be shouting at the screen that we didn’t do anything to option our PRI for AT&T Custom protocol. I chased this for days when I was trying to get this set up initially, convinced that this was why I had a yellow alarm on the Asterisk side and a red alarm on the 100D board. It was not the reason. The reason was the awful Digium TE110PE board. The long and short of it is, from an Asterisk perspective, setting the switchtype to Lucent 5ESS is enough. There is no setting in DAHDI for AT&T Custom protocol, and setting your switchtype to Lucent 5ESS provisions this automatically. Apparently, DAHDI and Asterisk don’t support a 5ESS switchtype using NI2 protocol, or any others. So don’t worry about it!
Asterisk Context
Note that in Figure 3, Context is set to from-internal. This was a manual change, as the setting will default to from-digital. This affects our PRI’s interaction with the Asterisk dialplan rules, and is the key to allowing Asterisk to route calls from the Merlin to a SIP trunk. Leaving Context at from-digital will cause our calls originating from the Merlin and destined for the PSTN through our SIP trunk to fail.
Create DAHDI Trunk
For this step, navigate through the FreePBX GUI menus to Connectivity -> Trunks, then click Add Trunk -> Add DAHDi Trunk, and configure your trunk as in Figures 4 and 5, below:
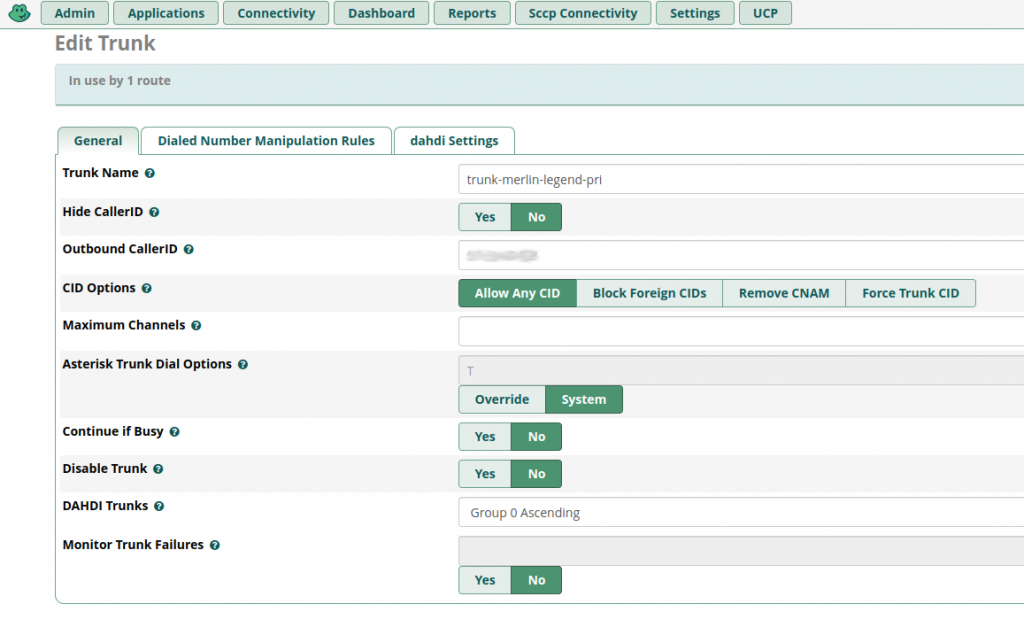
Figure 4: DAHDi Trunk Settings

Figure 5: DAHDi Settings
In Figure 5, note that the DAHDi identifier is g0. The 0 represents the group number displayed in our DAHDi Span Settings in Figure 3. This is how we associate our new DAHDi trunk with our PRI.
Set Inbound Routes
We will need an inbound route to tell Asterisk how to route calls coming from our PRI (and ultimately from the Merlin Legend) that follow the North American Numbering Plan. This route will take such calls and route them through a SIP trunk. Note that if you live outside the United States, you will need to modify this route.
To do this, navigate in the FreePBX GUI menus to Connectivity -> Inbound Routes, click the Add Inbound Route button, and configure your new route as follows:
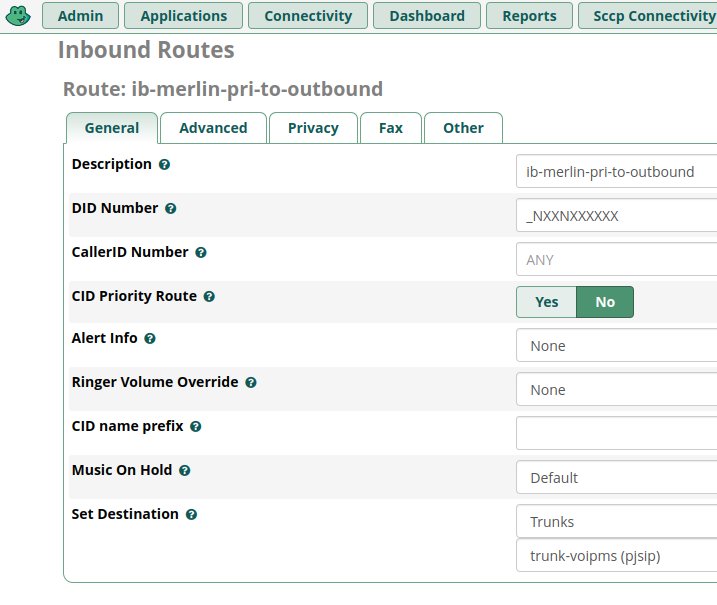
Figure 6: Inbound Route Configuration
You can change the Description if you wish. I like to name routes in a consistent manner that reveals something about their purpose. The non-default fields here are:
- Description: can be whatever you like
- DID Number: this is a pattern matching NANPA phone numbers (three-digit area code, three-digit exchange code, four-digit number). You may change this to match your country.
- Set Destination: The important parts are to choose Trunks, and then select the SIP trunk to which you want to redirect calls coming from our PRI in the list at the bottom of the dialog.
Set Outbound Routes (Optional)
Next, we’ll establish an Outbound Route to allow us to reach extensions on our Merlin Legend system from our Asterisk system. If you are not using any VoIP phones, this step may be skipped.
This route will require you to enter a prefix of 8 from any VoIP phone on your Asterisk system in order to dial your Merlin Legend extensions.
In order to complete this step, navigate to Connectivity -> Outbound Routes and click Add Outbound Route. Configure the routes per figures 7 and 8 below:
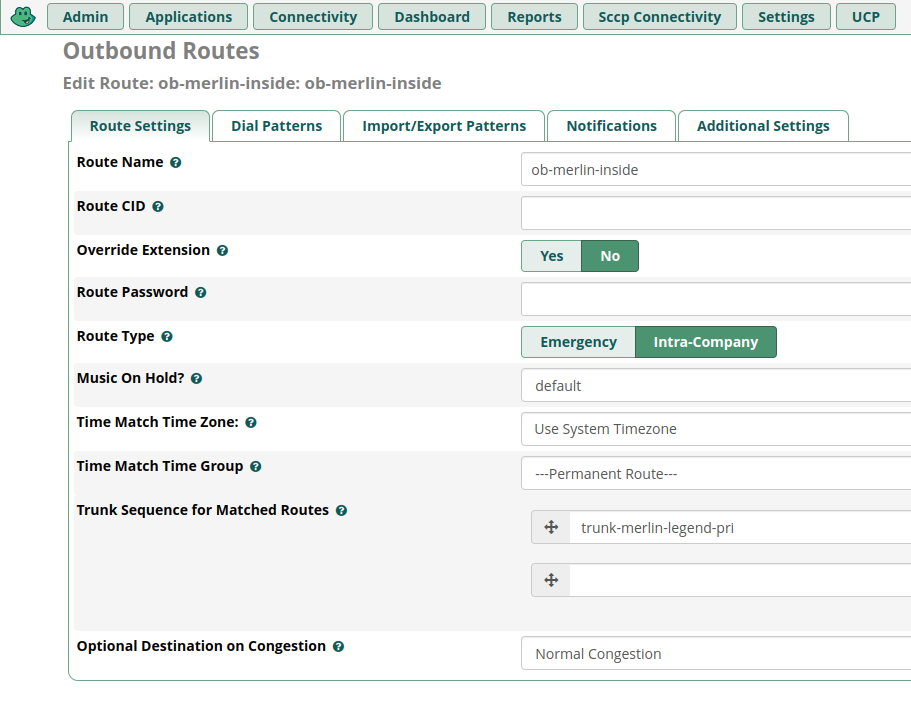
Figure 7: Outbound Route Configuration
The important fields in Figure 7 are Route Type and Trunk Sequence for Matched Routes. You must set Route Type to Intra-Company, and the only entry in Trunk Sequence for Matched Routes must be the trunk associated with our PRI.
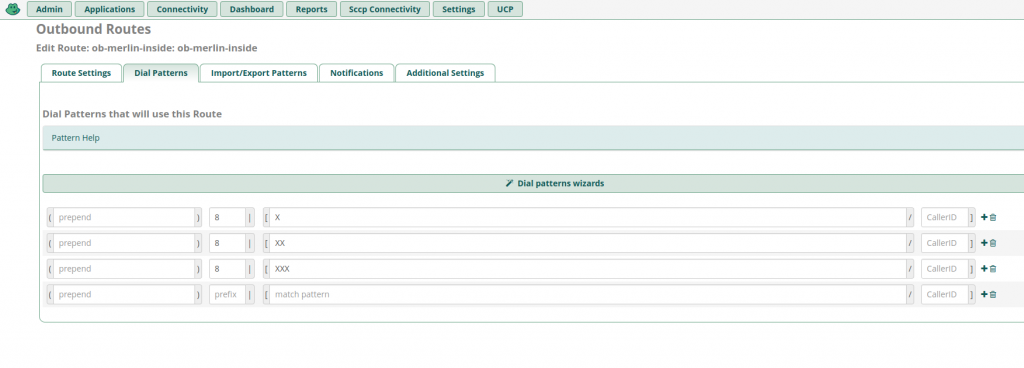
Figure 8: Outbound Route Dial Patterns
Note the use of 8 as our prefix, and the use of three patterns. These will allow one, two, and three-digit extensions on our Merlin Legend to be reached from our Asterisk/FreePBX network. If you use four-digit extensions, you will need to add an additional dial pattern.
Conclusion
As you can tell, using a PRI to integrate a “legacy” PBX like our Merlin Legend with a modern VoIP system is a lengthy and involved process, but once these basics are established, you will be able to give your Merlin Legend network access to all kinds of nifty features and creature comforts offered by modern VoIP systems, not the least of which being the low cost of SIP trunks. For instance, I have 16 VoIP DIDs, and pay less than $20/mo. for the privilege! Hopefully, this will allow telephony hobbyists and other PBX enjoyers like myself to get more out of our systems. I especially enjoy tinkering with Merlin Messaging auto-attendants and having them forward calls to other family members’ mobile phones!
This is why telephony is so rewarding for me: there is always a new thing to discover, learn, and play with. It’s a rich field for hours of enlightened and historically-relevant fun for the hobbyist willing to commit to it.
Please feel free to reach me on the Telephone Hobbyist’s Conference on Discord, or find me in the AT&T / Lucent / Avaya Phone Systems group on Facebook, which I frequent, if you find problems with these instructions, or have other feedback.
I would like to thank the members of the aforementioned Facebook for inspiring me to continue in this hobby, and also the YouTube channel of telecomguy10, whose recent videos have re-kindled my love of telephony and inspired this entire project.

Recent Comments